Introduction
This trial shares its difficulty scaling mechanic with Cloudrest whereby you can choose to kill the bosses in any order you want (there are no additional "trash" enemies). Heading to the last boss room, which is situated straight ahead as you enter the trial, before killing the side bosses will cause any boss(es) that you have not killed to join in the final boss fight with you. The difficulty of the trial is judged by how many additional bosses you take into the last boss fight; one additional boss denotes a +1 difficulty, two additional bosses denotes a +2 difficulty (Cloudrest has three side bosses so has an additional +3 difficulty).
As you can imagine the difficulty jumps up quite considerably when you have to deal with multiple bosses. We will look at each boss' mechanics individually in detail and give general tips on the final boss fight with and without the additional bosses.
Saint Llothis the Pious

Going left when facing the gate to the final boss will take you to Saint Llothis. This boss mainly performs AoE poison attacks which require quick reactions and decent positioning to deal with.
- Noxious Gas - The boss teleports to another area in the room (there are three set locations), leaving behind a poisonous AoE which will damage and snare any players inside.
- Defiled Blast - The boss will turn to a random player and target them with a large conal AoE which will follow that player around. This player will have a green, glowing effect on them to indicate that they have been targeted. The attack will do fair damage to the targeted player but considerably more to any other players caught within the cone.
- Oppressive Bolts - The boss starts channeling an attack (Soul Stained Corruption) indicated by a growing AoE underneath his feet. Any players caught inside this AoE when it reaches its full size will be pushed back. Upon finishing the channel the boss will start to fire poison bolts randomly at group members which deal a lot of damage. The attack can be interrupted.
- Corroding Bolt/Unraveling Energies - The boss briefly channels an attack before hitting the player with aggro with an AoE poison attack. Does minor damage to the tank but will also splash onto any other players inside the AoE.
- Imperfect Attendants - The boss' two assistants will awaken shortly after the fight begins and become inactive once their health has nearly depleted. After a short while of being inactive they will re-activate and repeat this cycle throughout the fight unless they are not damaged. If they are left alive they will enrage (after approximately thirty seconds) and they do have a few notable attacks:
- Hydraulic Sweep - Frontal conal attack that does a fair amount of damage.
- Pulverize - A leap into the air followed by a slam to the ground which deals a large amount of damage in an AoE around themselves.
- Energy Arc - A laser beam attack that does a lot of damage. Will be targeted at whoever has aggro but hit anyone else caught in the beam or final AoE explosion.
- Pulse & Expunge - Shock and physical damage attacks, these can be considered the light attacks from the boss.
There are two main ways to deal with this fight and it will depend a little on your tanks level experience and the group. You can leave the Imperfect Attendants alive and have one tank take them to one side (towards the gate in the centre of the area is the best place as it is furthest away from the three points the main boss teleports to) and simply ignore them completely and focus all damage on the boss. Otherwise, these should be focussed down first and killed each time they re-activate. I'd recommend the group maintaining distance from these to avoid their AoE attacks and taking them away from the main boss regardless of which way you choose to handle the fight. Stacking them on the boss can make some of his mechanics more awkward to deal with.
For Saint Llothis himself it is vital that the Soul Stained Corruption channel is interrupted as soon as possible to avoid the Oppressive Bolts attack, anyone can interrupt by bashing but it may benefit the group to have somebody with a ranged interrupt just in case. For the Defiled Blast conal attack it is recommended that the group forms a semi-circle behind the boss but staying close enough to be able to easily escape the cone when required. The targeted player should remain still and block while everyone else should step out of the cone, anyone in the cone will need to be targeted with heals. If the targeted player runs through the group with the cone it will likely cause multiple deaths. The group should avoid stacking on the tank to ensure they are not taking unnecessary damage from the tanks AoE.
When following the boss around after a teleport be careful to stay well clear of the Imperfect Attendants if you choose to leave them alive as their AoE attacks can one shot most group members.
Saint Felms the Bold

Going right when facing the gate to the final boss will take you to Saint Felms. This boss can get very messy, very quickly if some key mechanics are not dealt with properly. This is mainly because he leaves lingering AoEs in the wake of some of his attacks which can leave you very little room left to work with if you are not careful. Getting hit by any of his attacks will also apply Maim (shown as a buff in esologs currently) to the player causing their attacks to do less damage.
- Teleport Strike - The boss will teleport to the furthest player away from him, inflict them with a small bleeding DoT and leave behind a large, lingering AoE which deals more damage the longer you are inside it (Shrapnel Storm). The number of jumps the boss performs increases as the fight progresses: while above 75% health the boss will jump once, 75% - 50% health he'll jump twice and while less than 50% health he will jump three times.
- Manifest Wrath - Two players at random are targeted with an AoE attack that the boss throws into the air. It crashes down at the targeted players locations doing a lot of damage and shoots out three red waves that will damage anyone they hit.
- Pneuma Projections - Throughout the fight two additional enemies will spawn periodically and these will enrage after a while and start dealing a lot of damage. Their light attack (Quick Strike) will apply a minor bleed to whoever they are attacking (Butchers Bleed). They have two notable attacks:
- Cyclonic Carving - The enemy spins around in a large AoE dealing damage to anyone nearby. This can hit really hard when these enemies are enraged.
- Lead to Slaughter - A random player is targeted and pulled to the enemy. Doesn't deal much damage on its own but can pull you directly into another AoE.
Only one tank is really needed for this fight but the other tank can either help to deal with the adds or position one of the Shrapnel Storm AoEs away from the group. Positioning here is vital and it's recommended that two players (preferably tank/healer) position themselves on the edge of the area, one on the left and one on the right (east and west). These players act as "kiters" for the Teleport Strikes and position the AoEs away from the rest of the group, focussing mainly on staying alive and staying out of the group. The rest of the group should stack behind the boss (the boss is best positioned to the south where the tank has his back close to the wall) to direct the Manifest Wrath AoEs to a single location. To avoid the damage from this attack the group should wait for the AoE to show, dodge out of it before it hits and block while moving back into position to avoid taking a lot of damage from the waves.
The adds can be taunted by the main tank (or you can have an off tank hold them) and positioned on the boss so that everything takes damage together. They should be focussed and killed before they enrage so don't be afraid to use ultimates on them. Their AoE attack should be avoided or blocked (avoided if they are enraged). If you are pulled in then dodge out of any AoEs and quickly return to your position. Occassionally, one of the kiters will be pulled in resulting in an AoE being dropped on the group. In this instance the group should reposition slightly (left or right) and resume the fight from this location until the AoE disappears. The tank should also avoid standing in the Shrapnel Storm AoE if one is dropped on their location.
Saint Olms the Just

The huge mechanical dragon lurks behind the gates found straight ahead after entering the trial. He hits incredibly hard with his basic attacks and has several mechanics that can cause a lot of issues if you don't pay close attention to what is happening around you and coordinate well as a group.
- Swipe - The boss' light attack hits really hard, on par with heavy attacks from a lot of other bosses.
- Gusts of Steam - The boss jumps into the air four times, landing each time at a set location on the opposite side of the room and dealing huge damage to anyone in his landing zone (huge AoE) but also doing moderate damage to everyone no matter where they are. Everyone will get their own AoE under their feet during this attack and overlapping with another players AoE will cause you to take additional damage. These jumps occur when the boss' health reaches 90%, 75%, 50% and 25%.
- Exhaustive Charges - The boss looks up and spits up to two lightning balls at any players in front of him (180°) who are furthest away. If there is nobody but the tank in front of the boss then this will land on the tank. Similarly, if a DD steps in front of the boss they are likely to get an additional AoE spat at them. When this lands it leaves a lingering AoE that does a fair amount of damage and quickly drains your magicka.
- Storm the Heavens - The boss jumps and hovers in place for several seconds flapping his wings causing small shock AoEs to shoot out from under him in random directions. Additionally, every player will get five consecutive AoEs under their feet indicating where a shock attack will occur that, once they strike, will stay on the ground for a couple of seconds.
- Scalding Roar - A huge frontal conal steam breath which does massive amounts of damage to anyone caught inside.
- Trial by Fire - This is an additional mechanic that starts in execute (when the boss reaches 25% health) and consists of three large fire AoEs in different areas of the room, one at the front, one at the rear and one in the middle. These AoEs quickly spread and waves of flames will travel outwards from the middle of them. These start within seconds of one another and overlap so there is only ever a very small "safe" area to completely avoid the attack. The closer you are to the middle of the AoE when the damage occurs the more damage you will take and anyone hit by the attack will get a burning DoT on them.
- Thundering Tailswipe - If the player with aggro is behind the boss the boss will slam its tail into the ground a send out three shock AoEs in different directions.
- Ordinated Protector - Little dwemer spheres will continuously spawn in front of the boss throughout the fight. These do not actually attack but instead serve to protect the main boss by maintaining an invulnerable shield on him (Static Shield) indicated by the lightning beam they shoot at the boss. These will randomly choose one of many "turret" locations in the room which are indicated by the small, dark squares you can see on the floor which they will quickly move to and deploy the shield from.
- Ordinated Purifier - Little dwemer spiders that will target a random player, run towards them and self destruct (Martyrs Meltdown). They will leave behind a fire AoE where they died but it does not do a large amount of damage.
Hardmode
As mentioned in the introduction there is nothing mechanically different in hardmode here for the main boss itself; all of his attacks will play out in exactly the same way as non-hardmode. The difference is that you will now need to fight the other boss(es), dealing with their own mechanics, at the same time as the main boss and this overlapping of mechanics makes the fight a lot more difficult.
General - In order to explain one common strategy for dealing with this boss we'll need to highlight some reference points within the boss room. The "entrance" is where you opened the gate to enter the room, the "exit" is directly opposite this, the front will be the right side of the room (looking in from the entrance) and the rear will be the left. Before starting the fight it is a good idea to organise the group into some positions: group healer should stay behind the group at the rear, tank healer should stay at the front of the room against the front wall, DDs should form a semi-circle behind the boss but each with their own space as overlapping in this fight will cause problems. It helps for all supports to have a purge slotted in order to cleanse the group of the burning DoT in execute.
Tanking - Only one tank is needed for +0 so it is better to have the off tank switch to some damage sets if possible and pose as a DD. You will taunt the boss and face it towards the front of the room. If you can take a couple of steps back you'll force the boss to step towards you and it will cause him to jump exactly where required after 90%. You can survive the jumps while maintaining block and just be positioned towards the front of the room (a little bit past the entrance) ready to grab the boss when he lands again and keep him facing the front. When he performs Storm the Heavens you will not get the kiting circles provided you are standing close enough to the boss and any additional AoEs can just be blocked. It is important that you block every attack from this boss as they are lethal and make sure to also get out of the Scalding Roar attack as soon as possible. If you get a lightning AoE dropped on you move out of it quickly but try not to move the boss if possible.
Kite/Tank Healer - You will hug the front wall and behave as a kiter for the lightning AoEs; aiming to drop them off at the edge of the room, getting out of them quickly and keeping themselves and you alive. Correctly positioning these AoEs is key as you will also need to avoid the Scalding Breath from the boss. When the boss jumps you can either make your way to the exit side to provide heals for the players there or hug the front wall to avoid a one shot from the boss landing on your head.
Group Healer - You should always be behind the DDs and keep an eye on the boss' health to ensure you can get to a safe location for the jumps (Gusts of Steam) as the first jump will likely be directly on top of you. From the back of the room the whole group can be healed (mainly with Radiating Regeneration) and you should aim to move to the entrance side during the jumps in order to heal the players there. During the kite phase (Storm the Heavens) you should make sure you quickly move towards the back of the room while throwing out some heals in order to give the DDs space to kite the AoEs.
Damage Dealers - Before 90% the boss will not perform the Storm the Heavens mechanic and so you just need to be careful of the jumps. After he has landed back towards the tank it is important that you get to your assigned position and stay there, making sure you do not step in front of the boss at all to avoid getting a lightning field landing at your location. When the protector spheres spawn these need to be killed before you can damage the boss further; it is recommended to do this from range where possible (you can tab target these through the boss without moving) and keep to your assigned positions. When the boss jumps you should go to the closest safe zone (this will be entrance/exit), don't stack on other players, block and shield/self heal. Once you are comfortable with the boss' jumping positions you can continue to DPS the boss during this mechanic but you will still need to be healed. In execute, try to quickly ascertain where the third (central) fire AoE is going to land and if you can move to a safe area (again this will be either entrance/exit) then do so. If not, block the fire wave and trust that your supports will purge you (shield if needed).

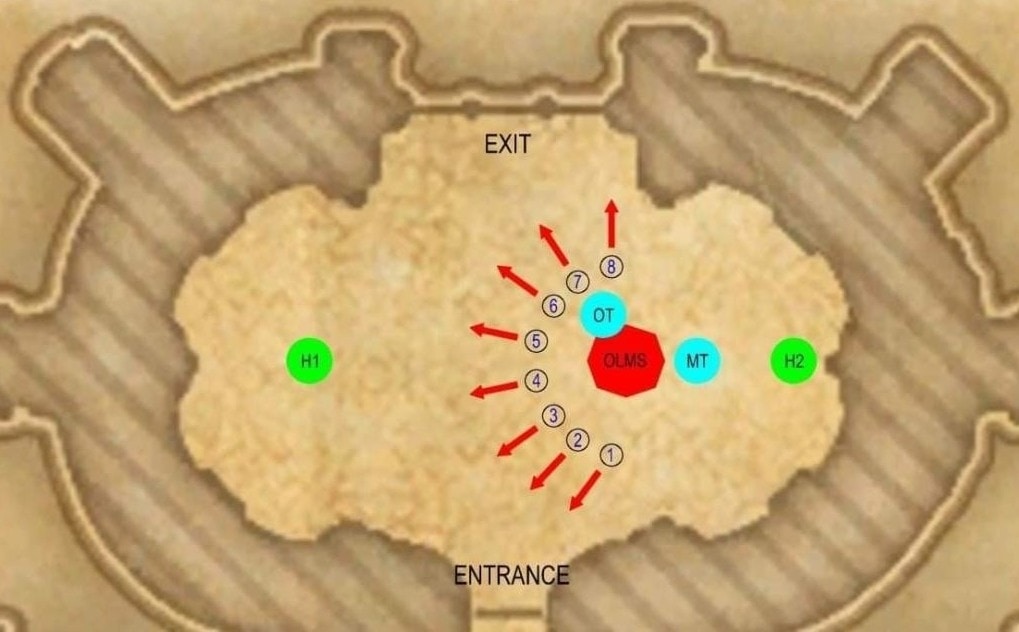
Positioning as shown allows DDs to avoid each other while kiting, gives the tank healer the front of the arena to position the AoEs and the group healer space to position the jump from St Felms. There is an off tank shown here which is only required for hardmode as this is where you would want the additional bosses positioned as much as possible. There are also eight DDs shown but this would likely increase to nine in non-hardmode (+0) giving each DD a little less space to work with so you would need to position accordingly.
Hardmode
Now we have additional bosses in the fight it is preferable to utilise two tanks. The main tank will handle Saint Olms as per non-hardmode and the off tank will taunt the additional boss(es) and try to stack them on Saint Olms as much as possible. The additional bosses have the same mechanics as when you face them alone except for the fact that they will not spawn their respective adds (no Inperfect Attendants or Pneuma Projections will spawn on the last boss). It helps to have one DD in a central position focus on interrupts for Saint Llothis as he will often jump somewhere before channeling his Oppressive Bolts attack and it is vital this gets interrupted. After three minutes of being active the side bosses will enrage and this will cause major issues. If you want to play it safe you should focus these bosses down first but a more common approach is to stack them on the main boss and bring them down gradually with AoE as this speeds up the fight. When the 3 minutes is nearing its end the group can switch focus from the main boss to the side boss to burn him down quickly. Once defeated the side bosses will deactivate in their current position for about 45 seconds before reactivating. During this fight if the Ordinated Protectors (Spheres) are not destroyed within 90 seconds then they can provide a shield for the mini bosses as well; this will occur if there is more than one Sphere up at a time.
Saint Llothis will still do the Defiled Blast (cone) mechanic which can occur at the same time as Storm the Heavens (kite). If this occurs the targeted player should aim to kite towards/away from Saint Llothis to keep the cone still. The blasts happen in pulses so there is time to kite one of the AoEs, block the blast and kite the next AoE etc. The timing is hard to get used to but it is possible and will likely require some practice. Saint Felms will also perform his Manifest Wrath (exploding AoEs) attack and continue to Teleport Strike to the furthest players but will always jump three times in this fight. The group healer should be ready to kite the first one of these as there is plenty of space at the back of the room and this is the perfect place to leave the AoEs (Shrapnel Storms). This means the front/tank healer should only get one jump from Saint Felms but it is still vital to position the AoEs well so that there is space left to move. These mechanics become very difficult to deal with when all overlapping so it is advised to practice with each boss separately (+1) and once you are comfortable move up to +2.
